| [<--] [Cover] [Table of Contents] [Concept Index] [Program Index] [-->] |
When you take an image file -- such as one containing a digitized photograph or a picture drawn with a graphics program -- and you make changes to it, you are editing an image.
This chapter contains recipes for editing and modifying images, including how to convert between image file formats. It also gives an overview of other image applications you might find useful, including the featuresome GIMP image editor.
Debian: `imagemagick'
WWW: ftp://ftp.wizards.dupont.com/pub/ImageMagick/
Many Linux tools can be used to transform or manipulate images in
various ways. One very useful package for both transforming images and
converting between image formats is the netpbm suite of utilities
(see Scanning Images). Another is the ImageMagick
suite of imaging tools, of which mogrify is particularly useful
for performing fast command line image transforms; use it to change the
size of, to rotate, or to reduce the colors in an image.
mogrify always takes the name of the file to work on as an
argument, and it writes its changes to that file. Use a hyphen
(`-') to specify the standard input, in which case mogrify
writes its output to the standard output.
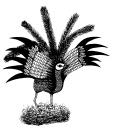
I'll use the image `phoenix.jpeg' in the examples that follow to
give you an understanding of how to use mogrify:
NOTE: You can also perform many of the image transformations described in the following sections interactively with the GIMP (see Editing Images with the GIMP).
To resize an image with mogrify, use the `-geometry' option
with the width and height values, in pixels, as an argument.
$ mogrify -geometry 480x320 phoenix.jpeg [RET]
This transforms the original `phoenix.jpeg' file to:

NOTE: Images scaled to a larger size will appear blocky or fuzzy.
When mogrify resizes an image, it maintains the image's
aspect ratio, so that the ratio between the width and height stays
the same. To force a conversion to a particular image size without
necessarily preserving its aspect ratio, append the geometry with an
exclamation point.
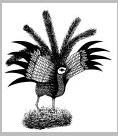
$ mogrify -geometry 640x480! phoenix.jpeg [RET]
This transforms the original `phoenix.jpeg' to:

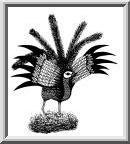
You can also specify the width or height by percentage. To decrease by a percentage, give the value followed by a percent sign (`%'). To increase by a percentage, give the value plus 100 followed by a percent sign. For example, to increase by 25 percent, give `125%'.
$ mogrify -geometry 125%x50% phoenix.jpeg [RET]
This transforms the original `phoenix.jpeg' to:
![]()
NOTE: To view an image at a particular scale without
modifying it, use display; when you resize its window, you resize
the image on the screen only (see Resizing a Window).
To rotate an image, use mogrify with the `-rotate' option
followed by the number of degrees to rotate by. If the image width
exceeds its height, follow this number with a `>', and if the
height exceeds its width, follow it with a `<'. (Since both
`<' and `>' are shell redirection operators, enclose this
argument in quotes, omitting either if the image height and width are
the same.)
$ mogrify -rotate '90<' phoenix.jpeg [RET]
This transforms the original `phoenix.jpeg' to:

NOTE: After this command, the width of `phoenix.jpeg' now exceeds its height, so to rotate it again use `>' instead of `<'.
You can use mogrify to make a number of adjustments in the color
of an image. To reduce the number of colors in an image, use the
`-colors' option, followed by the number of colors to use.
$ mogrify -colors 2 phoenix.jpeg [RET]
This transforms the original `phoenix.jpeg' to:

Use the `-dither' option to reduce the colors with Floyd-Steinberg error diffusion, a popular algorithm for improving image quality during color reduction.
$ mogrify -colors 4 -dither phoenix.jpeg [RET]
This transforms the original `phoenix.jpeg' to:

Use the `-map' option with a second file name as an argument to read the color map, or the set of colors, from the second image and use them in the first image.
$ mogrify -map prism.jpeg rainbow.jpeg [RET]
Use the `-monochrome' option to make a color image black and white.
$ mogrify -monochrome rainbow.jpeg [RET]
If you have a PPM file, use ppmquant to quantize, or reduce
to a specified quantity the colors in the image -- see the
ppmquant man page for details (see Reading a Page from the System Manual).
Because of differences in display hardware, the brightness of an image may vary from one computer system to another. For example, images created on a Macintosh usually appear darker on other systems. When you adjust the brightness of an image it is called gamma correction.
To adjust the brightness of an image, give the numeric level of correction to apply as an argument to the `-gamma' option. Most PC displays have a gamma value of 2.5, while Macintosh displays have a lower gamma value of 1.4.
$ mogrify -gamma .8 rainbow.jpeg [RET]
Debian: `libjpeg-progs'
WWW: http://www.ijg.org/
To annotate an image file with a comment, use mogrify with the
`-comment' option, giving the comment in quotes as an argument to
the option. This is useful for adding a copyright (or copyleft)
statement to an image, or for annotating an image file with a URL.
$ mogrify -comment "If you can read this,
you're too close!" phoenix.jpeg [RET]
You won't see the annotation when you view the image; it is added to the
image header in the file. You can, however, read image annotations with
tools that display information about an image file, such as
display or the GIMP. To read annotations in JPEG files, you can
also use the rdjpgcom tool -- it outputs any comments in the JPEG
file whose file name is given as an argument.
$ rdjpgcom phoenix.jpeg [RET]
If you can read this, you're too close!
$
NOTE: Another method for writing comments in JPEG files is to
use wrjpgcom, which is distributed with rdjpgcom in the
`libjpeg-progs' package.
To draw a border around an image, use mogrify with the
`-border' option followed by the width and height, in pixels, of
the border to use.
$ mogrify -border 2x4 phoenix.jpeg [RET]
This transforms the original `phoenix.jpeg' to:
NOTE: The border is added to the outside of the existing image; the image is not cropped or reduced in size to add the border.
The `-frame' option works like `-border', but it adds a more decorative border to an image.
$ mogrify -frame 8x8 phoenix.jpeg [RET]
This transforms the original `phoenix.jpeg' to:
To make a montage image of other images, use montage. It takes as
arguments the names of the images to use followed by the name of the
output file to write the montage image to.
The montage image is made by scaling all of the input images to fit the largest size possible up to 120x120 pixels, and tiling these images in rows of five and columns of four.
$ montage owl.jpeg thrush.jpeg warbler.jpeg endangered-birds.png [RET]
NOTE: In this example, three JPEGs were read and output to a PNG file; to specify the format to use in the output, give the appropriate file extension in the output file name.
Use combine to combine two images into one new image -- give the
names of the two source image files and the new file to write to as
arguments. Without any options, it makes a new image file by overlaying
the smaller of the two images over the larger, starting in the top left
corner; if both images are the same size, only the second image is
visible.
$ combine ashes.jpeg phoenix.jpeg picture.jpeg [RET]
You can specify the percentage to blend two images together with the `-blend' option. Give the amount to blend the second image into the first (as a percentage) as an argument to the option.
$ combine -blend 70 ashes.jpeg phoenix.jpeg picture.jpeg [RET]
This command combines the two images and writes a new image file, `picture.jpeg', whose contents contain 70 percent of the first image.
NOTE: Use `-blend 50' to blend the two source files equally.
Morphing is a method of computer imaging for finding the difference between the shapes in two images; it's often used in special effects to transform aspects of two creatures, such as the faces of a human and some other animal.
You can use combine to get a morph-like effect by giving the
difference argument to the `-compose' option. When specified
with two input images and an output file, this command takes the
difference between corresponding pixels in the two images; the effect is
like a "morphed" image.
$ combine -compose difference ashes.jpeg phoenix.jpeg picture.jpeg [RET]
The result in file `picture.jpeg' is:
NOTE: `xmorph' is a tool for morphing images; see Interactive Image Editors and Tools.
Debian: `imagemagick'
WWW: ftp://ftp.wizards.dupont.com/pub/ImageMagick/
Use convert to convert the file format of an image. Give the
name of the file to convert as the first argument, and the destination
file as the second argument. When you convert a file, the original is
not altered.
To specify the file type to convert to, use that file type's standard file extension in the file name of the converted file.
$ convert phoenix.jpeg phoenix.png [RET]
This command converts the JPEG image `phoenix.jpeg' to PNG format and writes it to a new file, `phoenix.png'.
The following table lists the file extensions to use and describes their format. (The convention is to give extensions in all lowercase letters.)
| FILE EXTENSION | IMAGE FORMAT |
bmp |
Microsoft Windows bitmap image. |
cgm |
Computer Graphics Metafile format. |
cmyk |
Raw cyan, magenta, yellow, and black bytes. |
eps |
Adobe Encapsulated PostScript. |
fax |
Group 3 fax format. |
fig |
TransFig image format. |
fpx |
FlashPix format. |
gif |
CompuServe Graphics Interchange Format, version GIF89a (usually pronounced "giff," rhyming with "biff"). |
gray |
Raw gray bytes. |
jpeg and jpg |
Joint Photographic Experts Group JFIF format (usually pronounced "jay-peg"). |
pbm |
Black and white portable bitmap format. |
pcd |
Kodak PhotoCD format, 512x768 pixels maximum resolution. |
pcl |
Page Control Language format. |
pcx |
ZSoft IBM PC Paintbrush format. |
pdf |
Adobe Portable Document Format. |
pict |
Apple Macintosh QuickDraw format. |
png |
Portable Network Graphics format (usually pronounced "ping"). |
pnm |
Portable "anymap" format. |
ppm |
Color portable pixmap format. |
ps |
Adobe PostScript format. |
rgb |
Raw red, green, and blue bytes. |
tga |
TrueVision Targa image format. |
tiff and tif |
Tagged Image File Format (usually pronounced "tiff"). |
xbm |
X Window System bitmap format. |
xpm |
Color X Window System pixmap format. |
xwd |
Color X Window System window "dump" file format. |
convert to convert a PNM file to non-interlaced
JPEG, while sharpening it, adding a border, and adding a copyright
statement.
$ convert -interlace NONE -sharpen 50 -border 2x2
-comment 'copyright 1999 MS' pike.pnm pike.jpeg [RET]
File
menu, and select the file type to use; see Editing Images with the GIMP.
Debian: `gimp'
Debian: `gimp-manual'
WWW: http://www.gimp.org/
The GIMP (GNU Image Manipulation Program) is an all-encompassing
image-editing and manipulation program that lets you paint, draw,
create, and edit images in complex ways. Using gimp you can also
convert image files, retouch and edit photographic images, and browse
collections of images.
The GIMP comes with hundreds of tools, filters, fonts, and other goodies installed. Here is a partial list of its features:
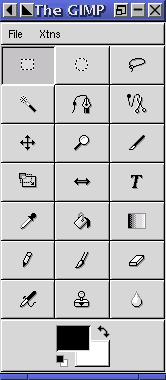
The GIMP runs under X and is started by running gimp or choosing
it from your window manager's menu. When started, the GIMP looks like
this:
NOTE: To learn the basics of the GIMP, consult The GIMP User's Manual and the other documentation and resources on the Web at http://www.gimp.org/. You can also install the manual on your system; it comes in the Debian `gimp-manual' package.
There are all kinds of image-editing software applications available for Linux -- and there are as many way to make and edit an image as there are tools to do it with.
The following table lists some other popular tools and applications for making and editing images -- including CAD engineering software -- that you may want to explore. It is not exhaustive.
| TOOL | DESCRIPTION |
bitmap |
Use the bitmap editor to edit bitmap files, which are used
for icons and tile patterns in the X Window System.
Debian: `xbase-clients' |
drgeo |
drgeo is a program for drawing interactive geometric figures.
Debian: `drgeo' WWW: http://members.xoom.com/FeYiLai/dr_geo/doctor_geo.html |
dia |
Use dia to draw simple charts and diagrams. It saves files
in its own format, but you can export files to EPS (see PostScript); if you plan on editing a diagram file again, however, be
sure you keep the `.dia' file since, as of this writing, dia
cannot import EPS files.
Debian: `dia' WWW: http://www.lysator.liu.se/~alla/dia |
electric |
Use electric for designing images of electronic circuitry.
WWW: http://www.gnu.org/software/electric/electric.html |
freedraft |
FREEdraft is a 2-D mechanical CAD tool for precision drawing and
sketching.
WWW: http://www.freeengineer.org/Freedraft/ |
gnuplot |
gnuplot is a robust, non-interactive function-plotting
tool. Given a data file and a formula, gnuplot can make charts
and graphs.
Debian: `gnuplot' WWW: ftp://ftp.gnu.org/pub/gnu/gnuplot/ |
ivtools |
The ivtools suite of software includes idraw, a
vector graphics editor.
Debian: `ivtools-bin' WWW: http://www.vectaport.com/ |
kali |
Use kali for drawing patterns and tilings, including frieze
patterns and infinite or recursive tiles in the spirit of M.C. Escher.
Debian: `kali' |
moonlight |
The Moonlight Creator is an X client for modeling, illuminating,
and rendering 3-D scenes.
Debian: `moonlight' WWW: http://www.cybersociety.com/moonlight/ |
sced |
sced is a tool for creating 3-D scenes.
Debian: `sced' WWW: http://www.cs.wisc.edu/~schenney/sced/sced.html |
xfig |
Use the venerable xfig application for drawing
figures -- complex graphs, floor plans, maps, flow charts, and so
forth. It saves files in its own format (giving them a `.fig'
extension by default); the usual thing to do is export to EPS.
Debian: `xfig' WWW: http://xfig.org/ |
xmorph |
xmorph is a tool to morph (sometimes called "warp") two
images together, making a new image in the process. Images must be in
TrueVision Targa file format, with the same size, shape, and number of
pixels in each file (also see Morphing Two Images Together).
Debian: `xmorph' WWW: http://www.colorado-research.com/~gourlay/software/} |
xpaint |
xpaint, a simple "paint" tool that predates the GIMP,
contains all of the basic features that you would expect from a paint
program. If you don't need the GIMP's advanced capabilities, consider
using the smaller xpaint instead.
Debian: `xpaint' WWW: http://www.danbbs.dk/~torsten/xpaint/index.html |
[<--] [Cover] [Table of Contents] [Concept Index] [Program Index] [-->]